Monday, April 29, 2024

Something Fancy Textured Floral Birthday with Pearlized Enamel Effects

Greetings!

I am excited to share this card with you today.  I recently realized that I very rarely purchase or use stamp sets that have multiple filled images that can be used to create bouquets and more, such as the images in the Textured Floral stamp set.  I had to flip through the catalog to help me get an idea of ways to stamp multiple images together to form a pleasing ensemble, and I'm very happy with the result.  


As we see in nature, flowers of many shades and colors all live together to create a beautiful picture for us, so it makes it easy to do the same when stamping.  I wouldn't necessarily have looked at Melon Mambo and Moody Mauve (the two flower colors) and thought they worked together well, but they do!  After creating the cluster of flowers, which took 4-5 attempts before coming up with the positioning and color combination that I liked 😏, I was ready to get it all put together.  I looked at the various adhesive backed gems and sequins and didn't see anything that felt right to add a little something extra to the card.  What to do, what to do!?  

While giving a final look to see what I could use, I looked at the Pearlized Enamel Effects and decided to add some color with a few drops of ink refill to the white. To create the splatter look, I used a toothpick to add drops of color onto the card front and the flower centers.  It gives the card dimension and a little shimmer, as well as a very one of a kind look.  


The Pearlized Enamel Effects come in a three-pack consisting of white, real red and black.  They allow you to paint or drop or dye these gel type liquids giving you a whole new way to add dimension to your creations.  The bottle has a fine tip, giving you control of how much or little you use.  If you haven't tried these yet, I hope this card gives you the inspiration to add them to your cart and have some fun expanding your creative options.

Keeping the sentiment small and simple so it didn't cover up much of the stamped image was easy with the "Happy Birthday" from the Something Fancy stamp set.  The other great thing about this set is the message to go with it gives you grace when your birthday card arrives a day or two (or more) after the recipients birthday.  I love that!  My intention is always to get the cards out on time, but that doesn't always happen - and I know I'm not alone 😄.  Scroll down through the instructions to see the message on the inside.

Gather Your Supplies:

  • Textured Floral Bundle (Save 10% when you purchase stamp set & die with bundle item#)
  • Something Fancy stamp set
  • Moody Mauve cardstock 
    • card base 4-1/4 x 11 scored & folded at 5-1/2    OR    5-1/2 x 8-1/2 scored & folded at 4-1/4
    • 2-1/2 x 1/2
  • Basic White cardstock
    • 4-3/4 x 4 panel
    • 2-1/2 x 1/2
    • 5 x 3-3/4 inside panel
  • Mango Melody Classic Stampin' Pad
  • Moody Mauve Classic Stampin' Pad
  • Berry Burst Classic Stampin' Pad
  • Lemon Lolly Classic Stampin' Pad
  • Old Olive Classic Stampin' Pad
  • Berry Burst Ink Refill
  • White Pearlized Enamel Effects
  • Moody Mauve Jute Trim - 16"
=============================================================
Product List

=============================================================
Here's How It's Made:

Ink each stamp as follows to create flower cluster:
  • Melon Mambo - large flower
  • Moody Mauve - smaller flower
  • Berry Burst - flower centers
  • Lemon Lolly - scattered flower buds
  • Old Olive - leaves

Wrap Moody Mauve Jute Trim around stamped panel, tie bow near left edge. Ink "Happy Birthday" with Berry Burst, stamp onto Basic White cardstock strip.  Adhere to Moody Mauve cardstock strip with a 1/4" offset at sides and bottom.  Adhere to stamped panel with Stampin' Dimensionals, over Jute trim.


Adhere to Moody Mauve folded card base, centering. 

In a small container, mix together 2-3 drops of Berry Burst Ink Refill and a pea-sized amount of White Pearlized Enamel Effects.  Mix together with a toothpick.  


Using toothpick, apply dots of dyed enamel effects to centers of both flowers, and create a splatter look at upper left and lower right of Basic White stamped panel.  Allow to dry.


Here's what the inside looks like.


Ink small flower with Moody Mauve, flower center with Berry Burst, and leaves with Old Olive. Stamp in lower right corner of Basic White panel.  

Ink sentiment with Berry Burst, stamp in upper center.  Adhere stamped panel to inside of card.

=============================================================

Essential Tools:

These are the tools I recommend  for a positive experience with all of your paper crafting projects.  Having the right tools makes every project go more smoothly from start to finish.

Product List

=============================================================


=============================================================

I LOVE being a Stampin' Up! Demonstrator for a variety of reasons!  If you love stamping and sending cards, getting together with friends and being creative, want a way to reach out to your community, earn some money doing something you love, or any combination of these things, and more, now is a great time to join! 


I am a member of Dawn Olchefske's DOStampers STARS community, so when you join my team, you are also part of this fabulous community where we share inspiration, creativity, support and education, as well as a whole new group of crafting friends!
=============================================================


=============================================================


April Host Code: TUUV3HH7

  • Place an online order of $65 or more (before tax/shipping) and earn a FREE Gift                        (FREE Gift sent by May 15th)
  • For orders of $150 or more in my store (before tax/shipping), do not apply the Host Code.  Use the Stampin' Rewards you will earn.  You will receive the Host code gift from me.
  • One Host code gift per customer, per month.

=============================================================

Thank you so much for stopping by!  I hope you're inspired to gather your supplies and get creative!  

Have a beautiful day!  😊  
Beverly J


Thursday, April 25, 2024

Drizzling Droplets Sentimental Park Bright & Beautiful Birthday Card

Greetings!

When the recent release of online exclusives was introduced, I was so excited to see the Drizzling Droplets stamp set.  One large stamp to use for backgrounds and it's a DistINKtive™ stamp, meaning it's designed so the opacity of the image varies, giving it a lot of texture.  I ordered it as soon as I was able, and it has been sitting out waiting for me to play with it.  Today I told myself, do something with this!  

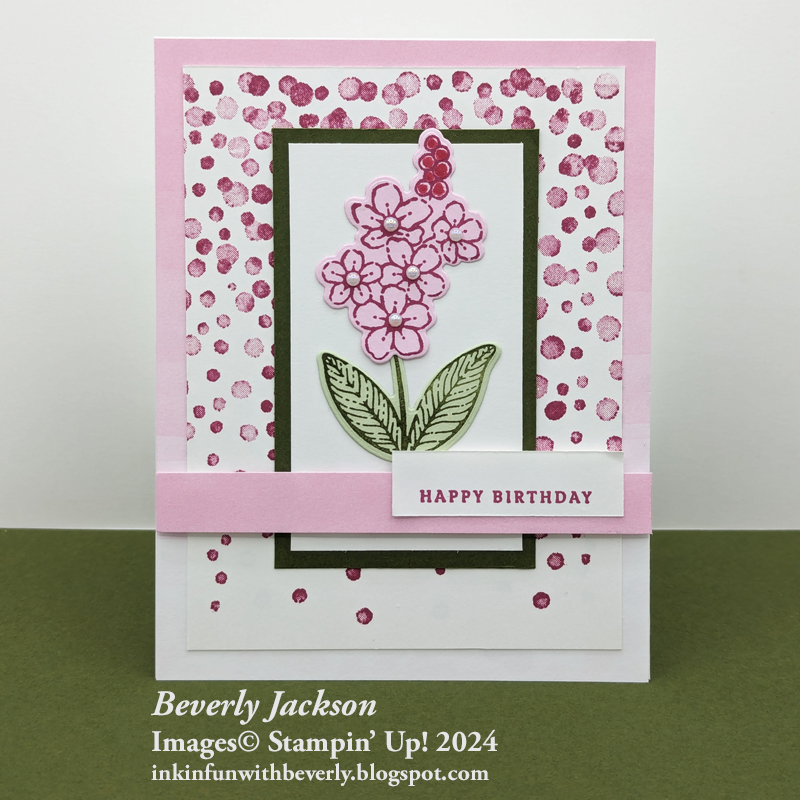
I knew the sample I had seen online with the stamp was part of the reason I really liked it.  With that being said, my card is very similar, but I switched up which stamps I used from the Sentimental Park stamp set and used different colors.  The Ombre' look really pairs nicely with the thinning of the quantity of droplets and the only papers I had with the Ombre' feature are from the Bright & Beautiful Designer Series Papers (DSP).  Since Bubble Bath was the color of the paper, that was a big part of my decision for my color choices.  I share these thoughts and decisions with you as a reminder to look at what you have and switch things out along the way.  This way you can still have a great card, use the general layout, or color combinations or whatever, but be flexible enough to know you don't need to have exactly the same products to still produce a beautiful card.


What can I say?  Somedays, I really look to various samples for my inspiration, and at other times it is all in my head.  Today I needed a little help with my creativity but I am super happy with how it turned out.  I hope you enjoy it too!

Gather Your Supplies:

  • Sentimental Park stamp set
  • Sentimental Park dies
  • Drizzling Droplets stamp set 
  • Basic White Thick cardstock 
    • card base 4-1/4 x 11 scored & folded at 5-1/2    OR    5-1/2 x 8-1/2 scored & folded at 4-1/4
  • Mossy Meadow cardstock
    • 3-3/4 x 2-1/4
  • Bubble Bath cardstock
    • 2-1/4 x 1-3/4
  • Soft Sea Foam cardstock
    • 2 x 1-3/4
  • Basic White cardstock
    • 5 x 3-3/4 panel
    • 3-1/2 x 2
    • 2 x 1/2
  • Bright & Beautiful Designer Series Paper 
    • 6 x 4-1/4 Bubble Bath Ombre' print
  • Berry Burst Classic Stampin' Pad
  • Mossy Meadow Classic Stampin' Pad
  • Melon Mambo Stampin' Write Marker
  • Iridescent Pearls
=============================================================
Product List

=============================================================
Here's How It's Made:

Cut 6 x 6 Ombre' Bubble Bath DSP print down with dark to light vertically, to 4-1/4" and cut off the top 1/2", so you have the darkest pink strip remaining.  You will be using this 4-1/4 x 1/2" strip later for this card.

Ink Drizzling Droplets stamp with Berry Burst, stamp onto Basic White cardstock panel.  

Adhere Ombre DSP to Basic White Thick folded card base front, then adhere Drizzling Droplets panel, centering.


Ink multi-flower cluster stamp with Berry Burst, stamp onto Bubble Bath cardstock.  Ink striped leaf stamp with Mossy Meadow, stamp onto Soft Sea Foam cardstock.  Die cut both  pieces with coordinating dies.  Partially fill in berries at top of flower cluster stamp with Melon Mambo Marker brush tip.  

Adhere Basic White cardstock to Mossy Meadow cardstock, centering.  Adhere die cut leaf/stem near bottom of Basic White, adhere flower cluster at top of stem.  


Adhere to card base front.  

Ink "happy birthday" with Berry Burst, stamp onto Basic White cardstock.  Adhere Bubble Bath  DSP strip to card front at bottom of leaves, with Stampin' Dimensionals.  Adhere Happy Birthday strip offset and aligned at right edge of Drizzling Droplets stamped panel.


Embellish flower centers with Iridescent Pearls.

=============================================================

Essential Tools:

These are the tools I recommend  for a positive experience with all of your paper crafting projects.  Having the right tools makes every project go more smoothly from start to finish.

Product List

=============================================================


=============================================================

I LOVE being a Stampin' Up! Demonstrator for a variety of reasons!  If you love stamping and sending cards, getting together with friends and being creative, want a way to reach out to your community, earn some money doing something you love, or any combination of these things, and more, now is a great time to join! 


I am a member of Dawn Olchefske's DOStampers STARS community, so when you join my team, you are also part of this fabulous community where we share inspiration, creativity, support and education, as well as a whole new group of crafting friends!
=============================================================


=============================================================


April Host Code: TUUV3HH7

  • Place an online order of $65 or more (before tax/shipping) and earn a FREE Gift                        (FREE Gift sent by May 15th)
  • For orders of $150 or more in my store (before tax/shipping), do not apply the Host Code.  Use the Stampin' Rewards you will earn.  You will receive the Host code gift from me.
  • One Host code gift per customer, per month.

=============================================================

Thank you so much for stopping by!  I hope you're inspired to gather your supplies and get creative!  

Have a beautiful day!  😊  
Beverly J