Monday, August 28, 2023

Dainty Delight Countryside Corners "Celebrate You" Card

 Greetings!

I've been wanting to use the Countryside Corners bundle for awhile and just hadn't gotten around to it until now.  I've used the dies many times, as they are such a fabulous shape for frames, but I wanted to use the stamp set that goes with them as well.  The stamp set features a wonderful variety of dots, dashes, little flowers and more as the detail for each frame.  

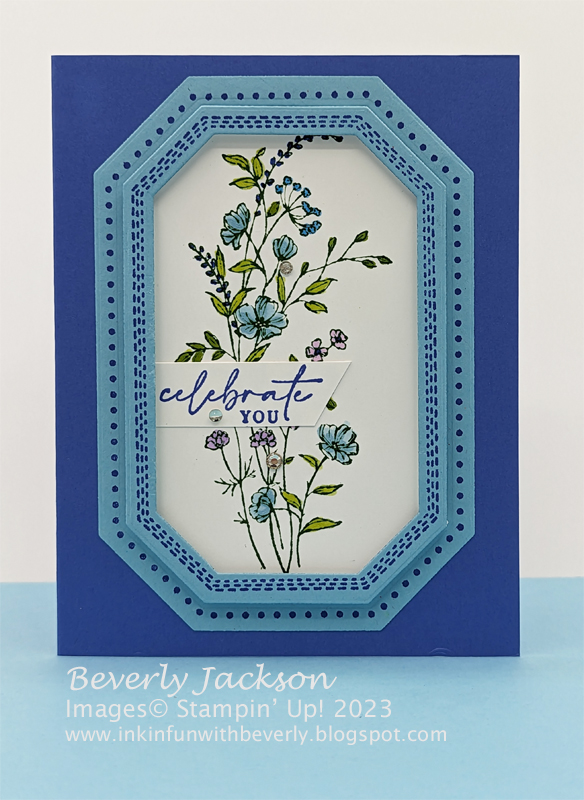
My next decision was what I was going to frame and the Dainty Delight stamp set offers lovely delicate floral arrangements which are the perfect sizes to fit in the frames.  I opted for the largest floral arrangement and it fits beautifully in the large Countryside Corner frames.


I'll admit, it took me a couple tries to get these layers to work the way I wanted, and to figure out the best way to adhere everything together.  Lucky for you, now I can simply share it all with you and save you the guesswork!😃

This was a fun one to color in and the Stampin' Blends are always such an easy way to color things in without losing the outline detail.  If you haven't tried them yet, I encourage you to get a few colors and start playing.  You'll feel like an artist in no time!

Gather Your Supplies:

  • Countryside Corners Bundle (Save 10% when you purchase stamp set & die with bundle item#)
  • Dainty Delight stamp set
  • Orchid Oasis cardstock 
    • card base 4-1/4 x 11 scored & folded at 5-1/2    OR    5-1/2 x 8-1/2 scored & folded at 4-1/4
  • Balmy Blue cardstock
    • 5-1/4 x 4 panel
  • Basic White  cardstock
    • 5 x 3-3/4
    • 2-1/4 x 5/8
    • 3 x 1-1/2 (for inside)
  • Garden Green Classic Stampin' Pad
  • Orchid Oasis Classic Stampin' Pad
  • Granny Apple Green Stampin' Blends
  • Orchid Oasis Stampin' Blends
  • Azure Afternoon Stampin' Blends
  • Balmy Blue Stampin' Blends
  • Highland Heather Stampin' Blends
  • Fresh Freesia Stampin' Blends
  • Rhinestone Basic Jewels
  • Foam Adhesive Strips
=============================================================
Product List

=============================================================
Here's How It's Made:

Ink Countryside Corners stamp with Orchid Oasis, stamp onto Balmy Blue cardstock.  Use the three largest Countryside Corners dies to cut out the two largest frames, using sticky notes or painters tape to hold the dies in place.   

Adhere largest die cut frame to Orchid Oasis folded card front, centering.  Adhere foam adhesive strips to back side of second largest frame (this has 3 rows of "stitching" around it).  Set aside.

Die cut Basic White cardstock with second largest Countryside Corners die.  Ink largest floral arrangement stamp with Garden Green, stamp onto die cut Basic White piece, centering.

Using Stampin' Blends, color in the floral arrangement as shown in photo below:


Adhere colored panel inside largest die cut frame on card front.  

Ink "Celebrate You" with Orchid Oasis, stamp onto Basic White strip.  Cut strip down close to top and bottom of text, then cut an angle on the right side.  Adhere over colored floral arrangement, aligning left edge to edge of white panel.


Remove backing from foam adhesive strips, and carefully align frame inside dotted frame,  adhere to Basic White cardstock die cut edge.

Embellish with Rhinestones.

Here's what the inside looks like:

Since the Countryside Corners stamp includes all the frame sizes on one stamp, I chose to die cut the remaining inside piece down to the frame with the small flower border.

Die cut Basic White piece using the die that fits inside the small flower border.  


Ink "The best is yet to come" with Orchid Oasis, stamp onto Basic White cardstock.  Ink the small grassy/flower stamp with Garden Green and stamp in lower right corner.  Color with Light and Dark Granny Apple Green and Dark Highland Heather Stampin' Blends.  Adhere to Balmy Blue die cut.

=============================================================

Essential Tools:

These are the tools I recommend  for a positive experience with all of your paper crafting projects.  Having the right tools makes every project go more smoothly from start to finish.

Product List

=============================================================


=============================================================
I LOVE being a Stampin' Up! Demonstrator for a variety of reasons!  If you love stamping and sending cards, getting together with friends and being creative, want a way to reach out to your community, earn some money doing something you love, or any combination of these things, and more, now is a great time to join! 

I am a member of Dawn Olchefske's DOStampers STARS community, so when you join my team, you are also part of this fabulous community where we share inspiration, creativity, support and education, as well as a whole new group of crafting friends!
=============================================================


August Host Code:  2YRBQMPJ

  • Place an online order of $65 or more (before tax/shipping) and earn a FREE Gift                        (FREE Gift sent by September 15th)
  • For orders of $150 or more in my store (before tax/shipping), do not apply the Host Code.  Use the Stampin' Rewards you will earn.  You will receive the Host code gift from me.
  • One Host code gift per customer, per month.

=============================================================

Thank you so much for stopping by!  I hope you're inspired to gather your supplies and get creative!  

Have a beautiful day!  😊  
Beverly J

Thursday, August 24, 2023

Gorgeously Made Wonderful Thoughts on Earthen Elegance DSP

Greetings!

Ever since my first page through of the 2023-2024 Annual Catalog, the sample on page 106 has stayed in my mind.  I loved the simplicity of the layout as well as the color palette.  I haven't purchased the stamp set that is featured for the sample so I had to find another one that I felt would still give me the look and feel of the sample.  

I knew for sure I wanted to use the same speckled paper for the background, which happens to be one of the Earthen Elegance Designer Series Paper (DSP) prints. My card ends up with a couple changes to the color palette but that's the whole fun of seeing something and using that as the starting point to your own creation.


I chose the Gorgeously Made stamp set for the images and the Wonderful Thoughts stamp set for the sentiment.  The Pretty Peacock triangular wedge of DSP is from the same sheet as the speckled neutral print is.  The sheet Ombre's from the neutral to the Pretty Peacock, making it an easy choice for the contrast piece.  

Spotlighting an image is such a fun technique and so easy to do.  The same image is stamped on both layers, with parts of the underlayer peaking out beyond what is in the circle on the top layer.  It takes your card from meh to wow very quickly.  It's also a great way to show an entire image without having to find a die that encompasses the whole image, or fussy cutting it.  In this instance it also gave me the opportunity to stamp the scattered text onto the background of the die cut circle, which adds extra texture to the image.

Gather Your Supplies:

  • Gorgeously Made stamp set
  • Wonderful Thoughts stamp set
  • Crumb Cake cardstock 
    • card base 4-1/4 x 11 scored & folded at 5-1/2    OR    5-1/2 x 8-1/2 scored & folded at 4-1/4
  • Wild Wheat cardstock
    • 3 x 3
    • 4-3/8 x 3/4
  • Earthen Elegance Designer Series Paper 
    • 5-1/4 x 4 neutral speckled print
    • 4 x 2-5/8 Pretty Peacock speckled print 
  • Wild Wheat Classic Stampin' Pad
  • Pretty Peacock Classic Stampin' Pad
  • Natural 1/4" Wavy trim - 7"
  • Brushed Brass Butterflies
  • Stylish Shapes dies
=============================================================
Product List

=============================================================
Here's How It's Made:
Ink leafy stem with Pretty Peacock, stamp in right half of neutral speckled DSP print.


Cut Pretty Peacock speckled DSP print diagonally from corner to opposite corner, which will give you two identical triangular shaped pieces.  Adhere Pretty Peacock DSP triangle so 2-5/8" side is at top and 4" side is at left edge of neutral speckled DSP piece. Point of triangle should be at bottom left edge.

Ink scattered word stamp with Wild Wheat, stamp onto Wild Wheat cardstock, re-inking and repeating to cover most of cardstock.  Ink leafy stem with Pretty Peacock, stamp onto Wild Wheat cardstock.  Die cut with 2-3/4" circle die over center of image.  


Adhere die cut circle, lining up stamped image with image on speckled neutral DSP, adhere with Stampin' Dimensionals.

Apply a thin line of Multipurpose Liquid Glue to diagonal edge of Pretty Peacock DSP, press Natural 1/4" Wavy trim to glue, making sure ends extend beyond paper.  Allow to dry for a couple minutes.  Fold trim ends to back of paper, secure with Scotch tape.

Adhere assembled DSP to Crumb Cake folded card front.  


Ink "You're Wonderful..." with Pretty Peacock, stamp near edge of Wild Wheat cardstock strip.  Place in Paper Trimmer, cut down so strip is between 1/4" and 3/8" wide.  Adhere to card front, positioning as shown.

Embellish with Brushed Brass Butterflies.

Here's what the inside looks like:


I opted to use the mid part of the DSP panel that shows the Ombre for the inside.  This piece measures 2-1/2 x 5.  

Ink "you've come so far..." with Pretty Peacock, stamp onto neutral part of DSP.  Ink leafy stem with Pretty Peacock, stamp off, stamp upper part near lower right corner of DSP.  Adhere to inside of card.

=============================================================

Essential Tools:

These are the tools I recommend  for a positive experience with all of your paper crafting projects.  Having the right tools makes every project go more smoothly from start to finish.

Product List

=============================================================


=============================================================
I LOVE being a Stampin' Up! Demonstrator for a variety of reasons!  If you love stamping and sending cards, getting together with friends and being creative, want a way to reach out to your community, earn some money doing something you love, or any combination of these things, and more, now is a great time to join! 

I am a member of Dawn Olchefske's DOStampers STARS community, so when you join my team, you are also part of this fabulous community where we share inspiration, creativity, support and education, as well as a whole new group of crafting friends!
=============================================================


August Host Code:  2YRBQMPJ

  • Place an online order of $65 or more (before tax/shipping) and earn a FREE Gift                        (FREE Gift sent by September 15th)
  • For orders of $150 or more in my store (before tax/shipping), do not apply the Host Code.  Use the Stampin' Rewards you will earn.  You will receive the Host code gift from me.
  • One Host code gift per customer, per month.

=============================================================

Thank you so much for stopping by!  I hope you're inspired to gather your supplies and get creative!  

Have a beautiful day!  😊  
Beverly J