Greetings!
Today's card features a technique I have not shared before. I originally intended for this to be a really simple card using the Flowing Flowers stamp set. I love this stamp set! It is a DistINKtive™ stamp, meaning it is designed so it creates different opacities in one stamped image. I tried a couple different ink colors on Basic White cardstock, and I just wasn't seeing what I wanted to, so I looked through some Designer Series Papers to help me become inspired. When flipping through the Abstract Beauty Designer Series Papers, which have touches of gold in them, I thought, hmm, what if I add some gold to this card. My color palette then took a turn in a different direction. I pulled out Smoky Slate cardstock and decided to stamp with the Tuxedo Black Memento Ink™, loved how it looked, and went from there to create this card.

Isn't it beautiful! The touches of gold really pop against the shades of black and white, and the Abstract Beauty Designer Series Papers (DSP) provided the perfect background paper with the ink splatters on white. I've been a bit intimidated with the Gilded Leafing, however, after using it the way I did for this card, I will definitely be pulling it out more often to add to cards. You too will find it quite user friendly when you follow the steps below to creating gold leaf highlights on your projects.
Gather Your Supplies:
- Flowing Flowers stamp set
- Art Gallery stamp set
- Basic Gray cardstock
- card base 4-1/4 x 11 scored & folded at 5-1/2 OR 5-1/2 x 8-1/2 scored & folded at 4-1/4
- Basic Black cardstock
- Smoky Slate cardstock
- Abstract Beauty Designer Series Paper
- 4 x 5-1/4 ink splatters on white
- Tuxedo Black Memento™ Ink Pad
- Gilded Leafing
- Gold Simply Elegant Trim - 14"
- Multipurpose Liquid Glue
=============================================================
Product List =============================================================
Here's How It's Made:
Ink large single flower stamp with Tuxedo Black Ink and stamp in corner of Smoky Slate cardstock piece.
Ink stamp again and stamp onto a sticky note to create a mask. Cut along the bottom edge of the flower and a little bit up the sides, then press to adhere over stamped flower.
Ink flower stamp with leaves and splatter, and stamp as shown. Remove mask.
Ink small three flower cluster and stamp to fill in around large flowers.
Apply Multipurpose Liquid Glue to various lines, spots and edges on the two large flowers (these are the areas you will be applying the gold leafing). Set aside to allow glue to dry to clear - it will still be tacky.
NOTE: The Gilded Leafing is lighter than feathers, so make sure there are no fans going when you open this or it will fly around.
Very Carefully remove lid from Gilded Leafing and pull out a small pinch and press onto the dried glue areas. Gently rub to remove excess from areas free of glue. If you need a bit more, grab another pinch and press onto glue areas. Replace cap as quickly as possible so Gilded Leafing doesn't fly around or spill. It is extremely fragile and falls apart very easily, so handle with care.
Run two or three strips of Stampin' Seal on back of Smoky Slate piece and arrange the Gold Simply Elegant Trim and press onto adhesive strips to hold in place once you've positioned it so pieces are showing as desired. Adhere, offset, to Basic Black cardstock using Stampin' Dimensionals.
Adhere Abstract Beauty DSP print to Basic Gray card base. Ink Happy Birthday (Art Gallery stamp set) with the Tuxedo Black ink and stamp near the lower right corner directly onto the ink splatter print.
Adhere assembled layers to card front.
Here's what the inside looks like:
Sneak peak alert!
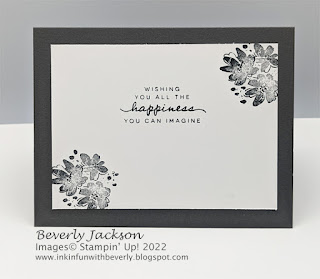
Ink small flower cluster with
Tuxedo Black ink and stamp onto opposite corners of 4-3/4 x 3-1/2
Basic White cardstock.
This beautiful message is from the soon to be available (as of May 3rd) Happiness Abounds stamp set.
=============================================================
Essential Tools:
These are the tools I recommend for a positive experience with all of your paper crafting projects. Having the right tools makes every project go more smoothly from start to finish.
=============================================================
Just a few more days left to take advantage of the retiring items from the current Annual Catalog. Many items are on sale for 20, 40 and even 50% off. All items are while supplies last through May 2nd.
=============================================================
April Host Code: ER46E7EV
- Place an online order of $65 or more (before tax/shipping) and earn a FREE Gift (FREE Gift sent by May 15th)
- For orders of $150 or more in my store (before tax/shipping), do not apply the Host Code. Use the Stampin' Rewards you will earn. You will receive the Host code gift from me.
- One Host code gift per customer, per month.
=============================================================
Thank you so much for stopping by! I hope you're inspired to gather your supplies and get creative!
Have a beautiful day! 😊
Beverly J


