Thursday, May 25, 2023

Life is Better When You're Crafting

 Greetings!

When I saw the Crafting With You Bundle, I thought, do I need that?  It's so cute!  I debated for a week or so, and decided, yep, I need this set!  I know...need is a strong word. 

This bundle really speaks to crafters using a multitude of mediums, from yarns to painting to sewing and of course, paper crafting and stamping.  The dies have the cutest accessories, and I have to say the scissors are my favorite!  They are two pieces that connect so it's just like having a real pair only they're made from cardstock.  So clever!  The little round brads from the Round & Square Brads are the perfect size to hold them together and give them movement.


Check out that paper trimmer die cut!  It's so ingenious to have the die cut so you can slide the cardstock under the guide, making it the perfect way to hold the piece with your message on it.  I know I will be finding all kinds of ways to use this set throughout the coming year.  Since many of my friends are crafters of some kind or another, this is going to be a go to for sending fun notes to them.

Think of all the fun you can have creating adorable cards to send to your friends!  Check out all the detailed dies when you're shopping.  It really is an amazing set.

Gather Your Supplies:

  • Crafting With You Bundle (Save 10% when you purchase stamp set & die with bundle item#)
  • Petal Pink cardstock 
    • card base 4-1/4 x 11 scored & folded at 5-1/2    OR    5-1/2 x 8-1/2 scored & folded at 4-1/4
  • Basic White cardstock
    • 3-1/4 x 1-1/2
  • Crushed Curry cardstock
    • scrap for scissors handles
  • Silver Foil cardstock (online exclusive)
    • scrap for scissors - lightest silver
  • Pebbled Path cardstock
    • 2-1/2 x 1-1/2
  • Smoky Slate cardstock
    • scrap for ruler
  • Delightfully Eclectic Designer Series Paper 
    • 4 x 5-1/4 panel Petal Pink/Crushed Curry lines on Very Vanilla Ledger print
  • Petal Pink Classic Stampin' Pad
  • Adhesive Sheets
  • White Round Brad
  • Piercing mat
  • Linen Thread - 6"
  • 2023-2025 In Color Dots
=============================================================
Product List
=============================================================
Here's How It's Made:
Adhere DSP panel to Petal Pink folded card front.

Die cut out paper trimmer and ruler.  Ink "Life is better..." with Petal Pink and stamp onto Basic White cardstock.   Position right edge of cardstock under guide piece of die cut paper trimmer. Adhere.  Adhere paper trimmer, sentiment and ruler to card front as shown:


Die cut scissors from lightest Silver Foil Sheet.  Apply Adhesive Sheet* to Crushed Curry cardstock, die cut scissors, snip off blade section, adhere to silver foil pieces.  Align pieces together, pierce hole using piercing tool and piercing mat, insert White Round Brad, bending both pieces flat along blade edge.  Press firmly to flatten.  Adhere on edge of paper trimmer with mini glue dots.

*If you haven't tried the Adhesive Sheets yet, I strongly encourage it for detailed die cuts.  It can sometimes be a bit tricky to grab an edge and pull off the protective backing, but it's so worth it to have a die cut that solidly adheres to your card without the mess of sticky fingers and shiny glue spots that can show when using liquid glue.  The Adhesive Sheets come in 12 x 6 sheets, and are scored every 2" on the 6" width, so it makes it easy to cut small pieces from the sheet and use only what is needed.  Love them!


Adhere Linen Thread with a mini glue dot, and cover glue dot with a large Copper Clay Dot.  Adhere Pebbled Path medium dot along cutting guide of paper trimmer to represent the cutting blade.  Embellish more additional dots in Wild Wheat and Copper Clay.

=============================================================

Essential Tools:

These are the tools I recommend  for a positive experience with all of your paper crafting projects.  Having the right tools makes every project go more smoothly from start to finish.

Product List
=============================================================
I LOVE being a Stampin' Up! Demonstrator for a variety of reasons!  If you love stamping and sending cards, getting together with friends and being creative, want a way to reach out to your community, earn some money doing something you love, or any combination of these things, and more, now is a great time to join! 


I am a member of Dawn Olchefske's DOStampers STARS community, so when you join my team, you are also part of this fabulous community where we share inspiration, creativity, support and education, as well as a whole new group of crafting friends!

=============================================================


May Host Code:  B6WP7JV7

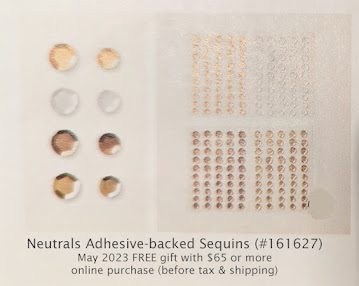
  • Place an online order of $65 or more (before tax/shipping) and earn a FREE Gift                        (FREE Gift sent by June 15th)
  • For orders of $150 or more in my store (before tax/shipping), do not apply the Host Code.  Use the Stampin' Rewards you will earn.  You will receive the Host code gift from me.
  • One Host code gift per customer, per month.
=============================================================
Thank you so much for stopping by!  I hope you're inspired to gather your supplies and get creative!  
Have a beautiful day!  😊  
Beverly J


Monday, May 22, 2023

Layering Leaves & Bough Punch Best Wishes Bouquet

Greetings!

Ever since the Bough Punch was introduced a couple years ago, I have been wishing there was a stamp set to go with it.  This year my wish came true!  The Layering Leaves stamp set has multiple images designed for the Bough Punch as well as some fabulous sentiments in a lovely, looping font.  When my order arrived earlier this week, I couldn't wait to get that stamp set out and play!

I wanted to make sure and create a card that used only punches.  Since the stamp set and punch provide the greenery and flowers, I wanted a vessel to hold the bouquet, so Double Oval Punch to the rescue.  I opted to use the scalloped oval and simply snipped off the top and bottom to create the vase for my bouquet.  It's a great way to make a quick vase!


Isn't it adorable!  The large single leaf is a wonderful addition in the Layering Leaves stamp set, and even though there is no punch for it, the simple shape is easily cut out with the Paper Snips.  

After punching the "vase" out of the strip of Cajun Craze cardstock, when trying to figure out my background mat layers, I slid the cardstock strip in behind the Basic White cardstock panel and thought; perfect!  You only know there is a scalloped oval shape missing out of the piece because I'm telling you ;-).  It's a great way to get the most out of a piece of cardstock.  

The background on the Basic White layer was easily created by using the splatter stamp that's included in the Layering Leaves set.  I simply used the same ink pads I used for stamping the leaves and did an Ombre' effect for the background.

Gather Your Supplies:

  • Layering Leaves stamp set
  • Bough Punch
  • Double Oval Punch
  • Garden Green cardstock 
    • card base 4-1/4 x 11 scored & folded at 5-1/2    OR    5-1/2 x 8-1/2 scored & folded at 4-1/4
    • scraps for leaves
  • Cajun Craze cardstock
    • 5-1/4 x 1-1/2
  • Lemon Lime Twist cardstock
    • 5-3/8 x 3
    • 3 x 1-1/2
  • Flirty Flamingo cardstock
    • 2 x 1-1/2
  • Basic White cardstock 
    • 5 x 3-1/2 panel
  • Garden Green Classic Stampin' Pad
  • Lemon Lime Twist Classic Stampin' Pad
  • Granny Apple Green Classic Stampin' Pad
  • Flirty Flamingo Classic Stampin' Pad
  • Parakeet Party Baker's Twine - 10"
  • Copper Brushed Metallic Dots
=============================================================
Product List
=============================================================
Here's How It's Made:
Punch scalloped oval from Cajun Craze, making sure to leave at least 1/8" at long edge and short edge of Cajun Craze piece as this will be layered under the stamped Basic White panel.  Trim 1/4" off top and bottom of scalloped oval.

Ink splatter stamp with Garden Green and stamp splatters on top third of Basic White cardstock panel.  Clean stamp, ink with Granny Apple Green and stamp splatters on middle third of Basic White panel.  Clean stamp, ink with Lemon Lime Twist and stamp remaining portion of Basic White panel.  Ink "Best Wishes" with Garden Green and stamp just below middle left side of Basic White panel.


Ink large single leaf stamp with Garden Green, stamp onto Garden Green cardstock.  Re-ink and stamp two more times.  Fussy cut all three leaves using Paper Snips.  Ink veined leaf branch with Granny Apple Green, stamp onto small Lemon Lime Twist cardstock.  Ink leaves only stamp with Lemon Lime Twist, align and stamp onto Granny Apple Green branch.  Line up in Bough Punch, punch.

Ink rosebud stamp with Flirty Flamingo, stamp onto Flirty Flamingo cardstock.  Re-ink and stamp one more.  Align in Bough Punch, punch.

Apply 2-3 strips of adhesive to back of Cajun Craze vase, adhere leafy branch stem, rosebud stems and 2 large leaves to vase.  Use mini glue dots to secure plants to one another.  Adhere top large single leaf behind upper part of leafy branch using mini glue dots.  Adhere to right side of Basic White cardstock panel with Stampin' Dimensionals.  


Adhere Cajun Craze cardstock to left side of Basic White panel, leaving a 1/8" border on all three sides.  Adhere Lemon Lime Twist panel to right side of Basic White panel, leaving a 1/4" border on all three sides.  Adhere to Garden Green folded card base.  

Tie Parakeet Party Baker's twine into a bow, adhere to vase with mini glue dot.  Embellish with Copper Brushed Metallic Dots.

=============================================================
Product List
=============================================================
I LOVE being a Stampin' Up! Demonstrator for a variety of reasons!  If you love stamping and sending cards, getting together with friends and being creative, want a way to reach out to your community, earn some money doing something you love, or any combination of these things, and more, now is a great time to join! 


I am a member of Dawn Olchefske's DOStampers STARS community, so when you join my team, you are also part of this fabulous community where we share inspiration, creativity, support and education, as well as a whole new group of crafting friends!
=============================================================

May Host Code:  B6WP7JV7

  • Place an online order of $65 or more (before tax/shipping) and earn a FREE Gift                        (FREE Gift sent by June 15th)
  • For orders of $150 or more in my store (before tax/shipping), do not apply the Host Code.  Use the Stampin' Rewards you will earn.  You will receive the Host code gift from me.
  • One Host code gift per customer, per month.
=============================================================
Thank you so much for stopping by!  I hope you're inspired to gather your supplies and get creative!  
Have a beautiful day!  😊  
Beverly J