
Greetings!
Tulips truly are a symbol of springtime and the Flowering Tulips bundle has them looking so real you can almost smell them! The Tulips Dies are designed to fold and layer to create dimensional blooms. They are amazing! Since the blooms are dimensional I wanted to create a card that would not flatten them out when slid into an envelope. By raising the layer around the flower this is achieved and the Tasteful Labels dies have great shapes to use for frames.

Isn't it lovely! The woodgrain print from the Bloom Where You're Planted Designer Series Paper (DSP) makes the perfect frame. I wanted a little something behind the tulip and the script stamp from the Very Versailles stamp set provides just the thing. This set also has sweet sentiments in a gorgeous font and when all put together gives the card a vintage feel. The tulip bloom is colored using the Blending Brushes so I could have it fade from dark to light from bottom to top. Since I had played with so many combinations for the blooms and loved the frame idea, here's another tulip blossom using a different frame from the Tasteful Labels die collection.

The Flowering Tulips bundle is incredibly versatile. As I've done here, you can create blooms with dies and a little coloring, you can stamp them and create gorgeous cards that way, and you can also cut out the stamped images to give dimension as well. This really is an amazing collection.
Gather Your Supplies:
- Flowering Tulips Bundle (Save 10% when you purchase the stamp set & die with the bundle item#)
- Very Versailles stamp set
- Cinnamon Cider cardstock
- card base 4-1/4 x 11 scored & folded at 5-1/2 OR 5-1/2 x 8-1/2 scored & folded at 4-1/4
- Garden Green cardstock
- scraps for stem and leaves
- Basic White cardstock
- 4-1/4 x 3-1/4
- scraps for tulips
- Bloom Where You're Planted Designer Series Paper
- 5-3/8 x 4-1/4 woodgrain print
- Garden Green Classic Stampin' Pad
- Daffodil Delight Classic Stampin' Pad
- So Saffron Classic Stampin' Pad
- Cinnamon Cider Classic Stampin' Pad
- Tasteful Labels dies
- Stampin' Cut & Emboss Machine
=============================================================
Product List ")

 Designer Series Paper")


=============================================================
Here's How It's Made:
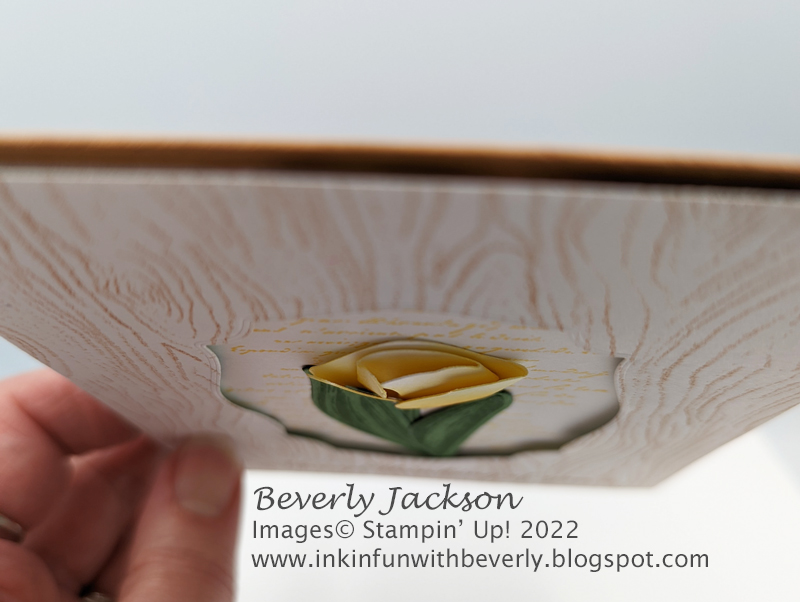
Center Tasteful Labels frame die in center of woodgrain print DSP, and die cut. For a nice solid raised frame, apply Stampin' Dimensionals generously. I like to use the outside edges to give the piece stability. Here's what I mean:

Ink script stamp with So Saffron, stamp off once, then stamp onto Basic White cardstock. Adhere to center front of card base. Make sure that it's positioned so most of the script will show behind the framed opening.

Adhere die cut frame to card front. I found it much easier to place the tulip by attaching the frame first and then inserting the tulip into the framed opening.
Die cut tulip pieces from Basic White scraps. Fold at score lines and try different combinations of elements until you find the bloom you want to use. Rub Blending Brush on Daffodil Delight ink pad to collect ink and gently rub onto die cuts with circular motions, making sure to color both sides, so insides will be colored too when assembled.

Ink stem and leaves with Garden Green and stamp onto Garden Green cardstock. Die cut with corresponding dies. Even the leaves and stems offer versatility as you can use them in all directions.
Place stem into frame opening - you may have to trim bottom for correct length. Adhere. Position tulip blossom layers and adhere to card. I adhered the top folded tulip layer with a mini glue dot so that the blossom retained dimension. Here's a top view:
This card is now ready to send or place into a picture frame and hang in your craft room.
=============================================================


=============================================================

March Host Code: ZYJJFTSX
- Place an online order of $65 or more (before tax/shipping) and earn a FREE Gift (FREE Gift sent by April 15th)
- For orders of $150 or more in my store (before tax/shipping), do not apply the Host Code. Use the Stampin' Rewards you will earn. You will receive the Host code gift from me.
- One Host code gift per customer, per month.
=============================================================
Thank you so much for stopping by! I hope you're inspired to gather your supplies and get creative!
Have a beautiful day! 😊
Beverly J
No comments:
Post a Comment