Greetings!
I am so excited to have embossing powders back in stock! Yippee! They weren't available for a while because Stampin' Up! had to find a new supplier for them, and I am really happy with the new powder. Super fine granules, and works beautifully. I don't like to blog using products you aren't able to get and I've missed sharing projects featuring heat embossing. It truly is one of my favorite techniques, and provides a wow to every card that it's used on.
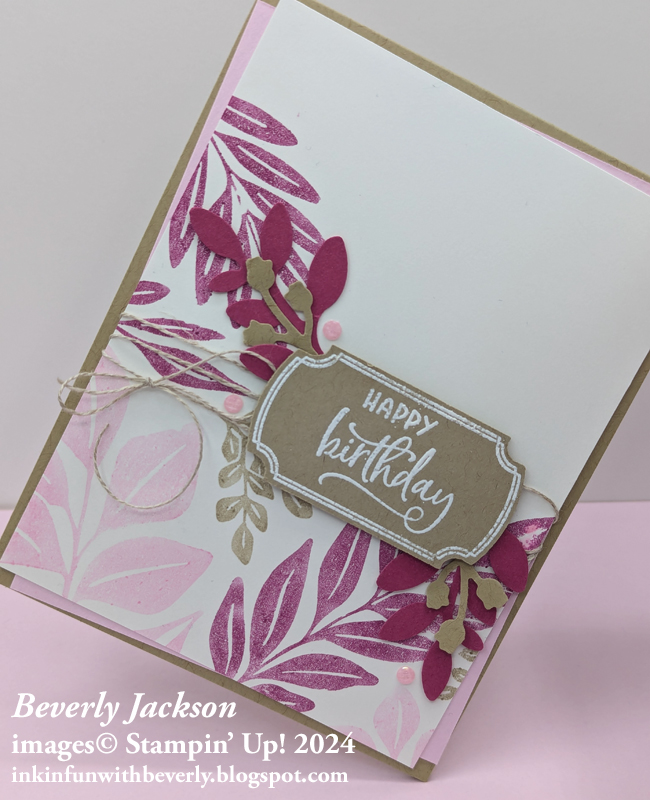
For today's card, my inspiration came from an online communication from Stampin' Up! featuring the Leaf Collection stamp set. I copied the coloring idea they showed with a slight variation, added a few extra elements from the Bough Punch, and finished it with the sentiment from the Labeled With Love punch bundle. I heat embossed the frame around the label as well as the sentiment. There is no better way to get a nice white sentiment or image to pop on a color than heat embossing.
Isn't it lovely! The Leaf Collection stamp is one large stamp and there are so many ways to use it. You can ink the entire stamp one color, color the various leaves with sponge daubers, or markers, which is what I did for this card, use the entire image, or selectively color a few leaves. Coloring the leaves with markers is an easy way to have multiple colors on one stamped image.
I will admit, there is a bit of a struggle sometimes to get a nice even stamped image when working with these large stamps, so you just have to learn to accept it how it comes out, or try again. I ended up adding the little bough punch leaves and buds to cover up an area that didn't stamp very solidly. That's the fun of creating a card. A little flaw is simply an invitation to get creative and work with the flaw - it's not a mistake, just an opportunity for a new creative idea.
Gather Your Supplies:
- Leaf Collection stamp set
- Labeled With Love Bundle (Save 10% when you purchase stamp set & punch with bundle item#)
- Crumb Cake cardstock
- card base 4-1/4 x 11 scored & folded at 5-1/2 OR 5-1/2 x 8-1/2 scored & folded at 4-1/4
- 4 x 2
- Bubble Bath cardstock
- Basic White cardstock
- Berry Burst cardstock
- Berry Burst Stampin' Write Marker
- Bubble Bath Stampin' Write Marker
- Crumb Cake Stampin' Write Marker
- Versamark Ink Pad
- White Embossing Powder
- Linen Thread - 32"
- 2024-2026 In Color Shimmer Gems
- Bough Punch
- Heat Tool
=============================================================
Product List
=============================================================
Here's How It's Made:
Adhere Bubble Bath cardstock panel to Crumb Cake folded card front, angling so each corner touches edge of card front.
With Berry Burst, Bubble Bath and Crumb Cake Stampin' Write Markers, color leaves on stamp, breathe on them to remoisten ink, then stamp onto Basic White cardstock, as shown here:
Ink label frame stamp with Versamark, stamp onto Crumb Cake cardstock. Ink sentiment with Versamark, stamp inside frame. Sprinkle White embossing powder onto stamped images, shake off excess, heat with heat tool to set, punch. Punch two leafy stems from Berry Burst, two bud stems from Crumb Cake.
Wrap linen thread three times around Basic White stamped panel, tie bow. Position thread so sentiment label will sit over it. (I positioned the label and punched leaves to cover the area that didn't stamp solidly). Adhere label over thread with Stampin' Dimensionals. Position Berry Burst and Crumb Cake punched pieces extending from upper left and lower right of label. Adhere with mini glue dots.
Adhere to card front, angling opposite direction from Bubble Bath layer.
Embellish with Pretty In Pink Shimmer Gems.
=============================================================
Essential Tools:
These are the tools I recommend for a positive experience with all of your paper crafting projects. Having the right tools makes every project go more smoothly from start to finish.
=============================================================
=============================================================
If you've ever thought it would be fun to get great products at a discount, inspire others, be part of a crafting community and more, I encourage you to check out the benefits of being a Stampin' Up Demonstrator. Whether you want it as a hobby, a chance to have an easy store at your fingertips for you and your friends, or want to build a business, the decision is yours. Click on the button below to find out more.
I am a member of Dawn Olchefskes' DOStampers STARS community, so when you join my team, you are also part of this fabulous community where we share inspiration, creativity, support and education!
=============================================================
=============================================================
- Place an online order of $75 or more (before tax/shipping) and earn a FREE Gift (FREE Gift sent by August 15th)
- For orders of $150 or more in my store (before tax/shipping), do not apply the Host Code. Use the Stampin' Rewards you will earn. You will receive the Host code gift from me.
- One Host code gift per customer, per month.
=============================================================
Thank you so much for stopping by! I hope you're inspired to gather your supplies and get creative!
Have a beautiful day! 😊
Beverly J


")


")


No comments:
Post a Comment