Greetings!
Being a Stampin' Up! Independent Demonstrator is so fun and one of the reasons is being part of a wonderful community of demonstrators. I have an awesome leader in Dawn Olchefske and she does a great job of giving all of us on her team challenges to engage our creativity. This past month one of her challenges was to do a card with a sponging/blending brush technique. My mind immediately started thinking of different ways I could incorporate this technique and looking at my stamp sets and papers to see what I could put together that would work.
I recently purchased the Winter Owls bundle and wanted to use it, thinking it would be lovely to have an owl flying with a dusk colored background, and the Winter Meadow Designer Series Papers (DSP) has the perfect print for the background. After playing around with a few color combinations, here's the finished card. It's the first time I've worked with the Small Blending Brushes and I really like them. I love how it turned out!
Isn't that background lovely! It's so perfect for this owl to be flying above and is easy to do thanks to the gorgeous print I started with. To give the stamping detail on the owl and the moon I brushed over it with the Wink of Stella Clear Glitter Brush so it has a lovely shimmer to it.
Gather Your Supplies:
- Winter Owls Bundle (Save 10% when you purchase stamp set & die with bundle item#)
- Basic White Thick cardstock
- card base 4-1/4 x 11 scored & folded at 5-1/2 OR 5-1/2 x 8-1/2 scored & folded at 4-1/4
- Basic White cardstock
- Vellum cardstock
- Winter Meadow Designer Series Paper
- 5 x 6 Gray trees & deer print (see below for cutting details)
- Highland Heather Classic Stampin' Pad
- Starry Sky Classic Stampin' Pad
- Night of Navy Classic Stampin' Pad
- Smoky Slate Classic Stampin' Pad
- Small Blending Brushes
- Wink of Stella Clear Glitter Brush
=============================================================
Product List
=============================================================
Here's How It's Made:
To get simply the tree tops for this card, begin with a 6" high x 5" wide piece of the print;
then cut off the bottom 2", so you are eliminating the deer silhouettes, as shown here:
Begin shading background by brushing your Small Blending Brush onto the Highland Heather ink pad, then lightly brush in circular motions, brushing color onto the DSP, beginning off the paper on one end, slowly brushing onto the DSP all the way across in the middle area. Do the same thing with Starry Sky, brushing below the Highland Heather, and lastly with Night of Navy. Re-ink and brush more color until you are satisfied with the results.
If this is your first time trying this technique, I strongly recommend you practice on some basic white cardstock first to test the pressure. Starting with the lightest color and working to the darker is always advised, so you can blend them together as you work your way along.
Ink moon stamp with Smoky Slate, stamp in upper right corner area of DSP. Adhere to Basic White Thick card front with Stampin' Dimensionals.
Ink flying owl stamp with Smoky Slate, stamp onto Basic White cardstock. Die cut. Brush over feather/wing detail and eye and beak with Wink of Stella Clear Glitter Brush to slightly soften ink and add shimmer. Also brush onto entire moon.
Ink "warm wishes" with Night of Navy, stamp onto Vellum cardstock. Allow ink to dry or use low setting on Heat Tool or a hair dryer or fan to speed up drying. To adhere without adhesive showing, cut a 2" strip of Tear & Tape Adhesive in half lengthwise, and adhere to center back of Vellum.
Peel off backing, adhere to lower right of card front.
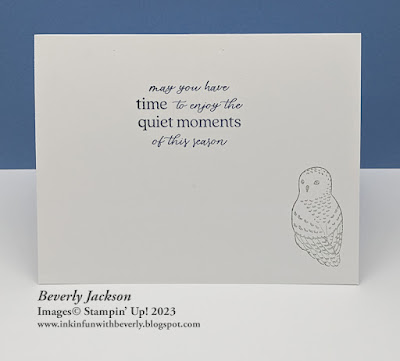
Here's what the inside looks like:
Ink "may you have..." with Night of Navy, stamp in upper middle of inside of card.
Ink resting owl with Smoky Slate, stamp off one, stamp in lower right corner of inside of card.
=============================================================
Essential Tools:
These are the tools I recommend for a positive experience with all of your paper crafting projects. Having the right tools makes every project go more smoothly from start to finish.
Product List
=============================================================
=============================================================
I LOVE being a Stampin' Up! Demonstrator for a variety of reasons! If you love stamping and sending cards, getting together with friends and being creative, want a way to reach out to your community, earn some money doing something you love, or any combination of these things, and more, now is a great time to join!
I am a member of Dawn Olchefske's DOStampers STARS community, so when you join my team, you are also part of this fabulous community where we share inspiration, creativity, support and education, as well as a whole new group of crafting friends!
=============================================================
October Host Code: PGGUU2TE
- Place an online order of $65 or more (before tax/shipping) and earn a FREE Gift (FREE Gift sent by November 15th)
- For orders of $150 or more in my store (before tax/shipping), do not apply the Host Code. Use the Stampin' Rewards you will earn. You will receive the Host code gift from me.
- One Host code gift per customer, per month.
=============================================================
Thank you so much for stopping by! I hope you're inspired to gather your supplies and get creative!
Have a beautiful day! 😊
Beverly J


No comments:
Post a Comment