
Greetings!
Sometimes you gotta have a party hat! The Abstract Beauty Designer Series Papers are gorgeous papers with the prints on one side including accents of gold. One of the papers has large gold dots on a white background and I decided it would make a fun party hat print! White and gold simply didn't say party to me, so I used the fabulous Blending Brushes to turn the white into Poppy Parade and now it's a party hat...on the front of a card.
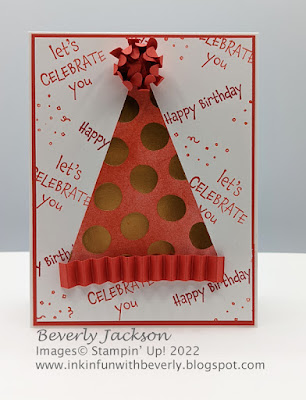
Even though the party hat is adorable all by itself - especially with the fun accordion fold rim and pom-pom on top it needed something more! The Hey Birthday Chick stamp set to the rescue! With the great celebratory sayings scattered on the background along with some confetti it now feels like a party.
How did I make the pom-pom you ask. I was thinking and thinking, what can I use? Then I remembered seeing a daisy with the ends curled up, and thought, yep, that will work. After a bit of playing with the Medium Daisy Punch, three daisies curled and stacked make a great pom-pom.
Isn't it fun! It's such a happy card - who wouldn't love to get this for their birthday.
Gather Your Supplies:
- Hey Birthday Chick stamp set
- Sunny Sentiments stamp set
- Basic White Thick cardstock
- card base 4-1/4 x 11 scored & folded at 5-1/2 OR 5-1/2 x 8-1/2 scored & folded at 4-1/4
- Poppy Parade cardstock
- 5-3/8 x 4-1/8 panel
- 6 x 1/2 strip
- 4 x 4
- Basic White cardstock
- 5-1/4 x 4
- Abstract Beauty 4 x 6 Designer Series Paper
- 4 x 3 white with gold dots
- Poppy Parade Classic Stampin' Pad
- Real Red Classic Stampin' Pad
- Blending Brushes
- Medium Daisy punch
- Paper Trimmer
- Bone Folder
- Multi-purpose liquid glue
- Clear Block C
***Hot Glue Gun to adhere bottom band to hat***
=============================================================

")
 Specialty Designer Series Paper")


=============================================================
Here's How It's Made:
Ink "let's celebrate you" with Poppy Parade and stamp randomly at various angles on Basic White Panel, then ink "happy birthday" with Real Red and stamp randomly in open spaces at various angles. Ink confetti stamp with Poppy Parade and stamp to fill in a few spaces. Adhere to Poppy Parade panel, and adhere to Basic White card base front.
Punch 3 daisies out of Poppy Parade cardstock using Medium Daisy punch. Curl petal edges up using angled tip of bone folder. Adhere two daisy centers together with petals offset from one another. Curl edges of third daisy, add multipurpose liquid glue to a few of the tips, and press all together to form a ball, hold for a minute to allow glue to set. Insert and adhere to center of other two daises. Here's a picture to give you a better look:

Brush Blending Brush on Poppy Parade ink pad to grab ink, brush in circular motions onto Abstract Beauty white/gold dot paper. Brush ink until you achieve desired color. Use a tissue to rub off ink on gold dots. On back side of piece, mark center of one of the 3" ends.(This should be 1-1/2"). Place in Paper Trimmer so paper is angled from outer corner to center line on opposite end. Cut. Flip paper and cut from other outer edge to center of opposite end. You should now have your triangle shaped piece, measuring 4 x 3 (on one end) to a point on the opposite end. Adhere to card base making sure to leave room at the top of the hat for the pom-pom.

Score the 6 x 1/2 strip of Poppy Parade cardstock every 1/4", and accordion fold.

Adhere to bottom of hat.
Note: After trying a couple adhesives, and not having them hold the band in place, I got my trusty hot glue gun out and ran a bead of hot glue along the bottom edge of the hat, pressed down the accordion fold strip, and that did the trick.
The greeting shown here is from the Sunny Sentiments stamp set.

Cut Poppy Parade cardstock 4-1/4 x 3-1/8. Adhere to inside of card.
Cut Basic White cardstock 2-3/4 x 4. Ink "hoping your birthday..." with Poppy Parade. Stamp onto cardstock. Adhere to Poppy Parade layer.
=============================================================

February HOST Code: J7T9HRYF
- Place an online order of $65 or more (before tax/shipping) and earn a FREE Gift (FREE Gift sent by March 15th)
- For orders of $150 or more in my store (before tax/shipping), do not apply the Host Code. Use the Stampin' Rewards you will earn. You will receive the Host code gift from me.
- One Host code gift per customer, per month.
=============================================================
Thank you so much for stopping by! I hope you're inspired to gather your supplies and get creative!
Have a beautiful day! 😊
Beverly J
No comments:
Post a Comment