Thursday, March 28, 2024

Cheerful Daisies Brightest Birthday Card

Greetings!

Today's card went from thought to completed project very quickly!  I saw a list of card ideas, one of which was a springtime theme, and I was off and running...well, creating. 😁

The Fresh As a Daisy Designer Series Papers (DSP) is filled with beautiful prints of daisies in a wide array of colors.  Simply looking at the colorful prints had my creative juices flowing.  Yellow was the color that popped out at me, so I pulled a few shades of yellow from my cardstock supply, pulled the same color ink pads, and it was time to start stamping.  The Cheerful Daisies bundle, which is designed to coordinate with the Fresh As a Daisy DSP, made putting this card together a snap!


All the beautiful yellows against a background of greens make this such a cheerful, springy card!  There are more lovely combinations included in this pack of papers, giving you a nice variety of options to play with. The papers are going away with the end of the 2023-2024 annual catalog (while supplies last) so you'll want to get them before they're gone. These papers make it so easy to bring together gorgeous color combinations as well as provide a wonderful allover print layer or background to your cards.   

Lucky for us, the Cheerful Daisies stamp set and dies are continuing for another year, but the 10% bundle discount ends with the current catalog.  It's the perk of purchasing the coordinating products during the first release to get the added bonus of the bundle discount.  After the initial release, the products continue forward as separate items.

Gather Your Supplies:

  • Cheerful Daisies Bundle (Save 10% when you purchase stamp set & die with bundle item#)
  • Daffodil Delight cardstock 
    • card base 4-1/4 x 11 scored & folded at 5-1/2    OR    5-1/2 x 8-1/2 scored & folded at 4-1/4
    • 4 x 3/4 
  • Lemon Lolly cardstock
    • 3-1/4 x 2-1/2
  • Basic White cardstock
    • 1-3/4 x 1-3/4
  • Garden Green cardstock
    • 1-1/2 x 1-1/2
  • Fresh As a Daisy Designer Series Paper 
    • 5-1/4 x 4 scattered daisies on green background print
  • Daffodil Delight Classic Stampin' Pad
  • Crushed Curry Classic Stampin' Pad
  • Lemon Lolly Classic Stampin' Pad
  • Early Espresso Stampin' Write Marker
  • Garden Green 3/8" ribbon - 8"
=============================================================
Product List

=============================================================
Here's How It's Made:

Position Garden Green cardstock under leaves extending from 3-daisy die, die cut.


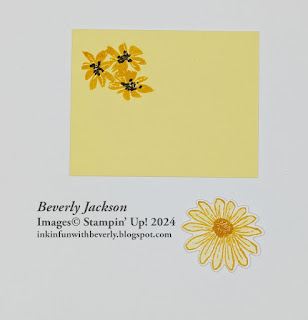
Ink small full single daisy outline stamp with Daffodil Delight, stamp onto Basic White cardstock.  Ink coordinating fill stamp with Lemon Lolly, stamp off once, then stamp over stamped outline.  Ink small center stamp with Crushed Curry, stamp in center of daisy.  Die cut with coordinating outline die.
Ink small 3 flower cluster stamp with Daffodil Delight, stamp near upper left corner of Lemon Lolly cardstock.  Fill in centers of flowers by tapping brush tip of Early Espresso marker onto cardstock.


Apply a small strip of adhesive to backside of scattered daisies DSP panel approximately 1-1/2" up from bottom.  Adhere end of Garden Green ribbon to adhesive, wrap around front of cardstock, adhere ribbon on back.


Adhere scattered daisies DSP panel to Daffodil Delight folded card front.  Adhere Lemon Lolly cardstock to card front, centering.  

Ink "wishing you ..." with Crushed Curry, stamp at right side of Daffodil Delight cardstock strip.  Adhere to card front with Stampin' Dimensionals, centering over ribbon and Lemon Lolly cardstock.  


Apply adhesive to back of die cut daisy, attach leaf stems to back of daisy, adhere left of sentiment on Daffodil Delight cardstock strip.

=============================================================

Essential Tools:

These are the tools I recommend  for a positive experience with all of your paper crafting projects.  Having the right tools makes every project go more smoothly from start to finish.

Product List

=============================================================


=============================================================

I LOVE being a Stampin' Up! Demonstrator for a variety of reasons!  If you love stamping and sending cards, getting together with friends and being creative, want a way to reach out to your community, earn some money doing something you love, or any combination of these things, and more, now is a great time to join! 


I am a member of Dawn Olchefske's DOStampers STARS community, so when you join my team, you are also part of this fabulous community where we share inspiration, creativity, support and education, as well as a whole new group of crafting friends!
=============================================================


=============================================================


March Host Code: 7NHEWMAF

  • Place an online order of $65 or more (before tax/shipping) and earn a FREE Gift                        (FREE Gift sent by April 15th)
  • For orders of $150 or more in my store (before tax/shipping), do not apply the Host Code.  Use the Stampin' Rewards you will earn.  You will receive the Host code gift from me.
  • One Host code gift per customer, per month.

=============================================================

Thank you so much for stopping by!  I hope you're inspired to gather your supplies and get creative!  

Have a beautiful day!  😊  
Beverly J


Monday, March 25, 2024

Earthen Textures 2022-2024 In Color Birthday Card

Greetings!

Today's card began with a thought for a simple birthday card with a background of the same image stamped multiple times in multiple colors.  Many months ago I remember seeing someone use the tall vase from the Earthen Textures bundle sideways, and that image lodged itself in my mind.  I decided to play with it for this card and I love the way it turned out.  The biggest thing to remember when stamping the same image multiple times in multiple colors, is to be sure and clean your stamp in between each color 😊.


To add a little dimension, the vase with the "Happy Birthday" message on it has been stamped onto the background and also stamped and die cut so it's popped up with Stampin' Dimensionals.  If you look closely, there is a little grass clump die cut, sideways, behind the message, for a little something extra.  Adding the strips of coordinating cardstock colors behind the stamped images helps to anchor each color.  

The "Happy Birthday"  from the Translucent Florals stamp set is in a small and simple font, and just the right size for this card.  It has the two words stacked and I simply cut out each word so they could be placed side by side, which works much better for this card.  Remember that even though a stamped message is oriented one way, the beauty of creativity is that you can cut it and switch it to suit your vision.  

These 2022-2024 In Colors are only around for a little while longer so make sure to get them before they're gone.  You can purchase the cardstock and the ink pads as a set, or stock up on your favorites individually.  They are bright and happy colors, and as you can see, they work very well together.  I didn't use the Sweet Sorbet in this card, but it rounds out this group of five 2022-2024 In Colors very nicely.

Gather Your Supplies:

  • Earthen Textures Bundle
  • Translucent Florals stamp set
  • Basic White Thick cardstock 
    • card base 4-1/4 x 11 scored & folded at 5-1/2    OR    5-1/2 x 8-1/2 scored & folded at 4-1/4
  • Basic White cardstock
    • 5 x 3-1/2 panel
    • 3-1/2 x 1-1/4 w/adhesive sheet
    • 3-1/2 x 2
  • Parakeet Party cardstock
    • 4 x 1/2
  • Tahitian Tide cardstock
    • 4 x 1/2
  • Starry Sky cardstock
    • 4 x 1/2 
    • 2-1/2 x 3/4 w/adhesive sheet
  • Orchid Oasis cardstock
    • 4 x 1/2
  • Parakeet Party Classic Stampin' Pad
  • Tahitian Tide Classic Stampin' Pad
  • Starry Sky Classic Stampin' Pad
  • Orchid Oasis Classic Stampin' Pad
  • Adhesive Sheets
  • 2022-2024 In Color Pearls
=============================================================
Product List

=============================================================
Here's How It's Made:

Ink tall vase stamp with Parakeet Party, stamp horizontally at top of Basic White cardstock panel.  Clean stamp.  Ink with Tahitian Tide, turn stamp 180 degrees (one end of vase is flat, other end is slightly rounded), stamp below Parakeet Party.  Clean.  Repeat with Starry Sky, then Orchid Oasis at bottom.


Apply adhesive sheet pieces to Basic White 3-1/2 x 1-1/4 and Starry Sky 2-1/2 x 3/4 cardstock pieces.  Die cut Basic White with palm frond die, and Starry Sky with grass clump die.  

Ink tall vase stamp with Starry Sky.  Stamp onto remaining Basic White cardstock, die cut. Adhere Starry Sky grass clump die cut to die cut vase as shown below.  Adhere palm frond onto stamped panel as shown.


Run a couple strips of adhesive on backside of Basic White stamped panel.  Position and adhere strips of cardstock behind coordinating stamped vases, with ends extending evenly on either side.


Adhere die cut Starry Sky vase with Stampin' Dimensionals on top of stamped Starry Sky vase.  Ink "Happy Birthday" with Starry Sky, stamp onto Basic White cardstock, cut out each word with Paper Snips, adhere words side by side over grassy clump.  


Embellish with 2022-2024 In Color Pearls.


=============================================================

Essential Tools:

These are the tools I recommend  for a positive experience with all of your paper crafting projects.  Having the right tools makes every project go more smoothly from start to finish.

Product List

=============================================================


=============================================================

I LOVE being a Stampin' Up! Demonstrator for a variety of reasons!  If you love stamping and sending cards, getting together with friends and being creative, want a way to reach out to your community, earn some money doing something you love, or any combination of these things, and more, now is a great time to join! 


I am a member of Dawn Olchefske's DOStampers STARS community, so when you join my team, you are also part of this fabulous community where we share inspiration, creativity, support and education, as well as a whole new group of crafting friends!
=============================================================


=============================================================


March Host Code: 7NHEWMAF

  • Place an online order of $65 or more (before tax/shipping) and earn a FREE Gift                        (FREE Gift sent by April 15th)
  • For orders of $150 or more in my store (before tax/shipping), do not apply the Host Code.  Use the Stampin' Rewards you will earn.  You will receive the Host code gift from me.
  • One Host code gift per customer, per month.

=============================================================

Thank you so much for stopping by!  I hope you're inspired to gather your supplies and get creative!  

Have a beautiful day!  😊  
Beverly J