Greetings!
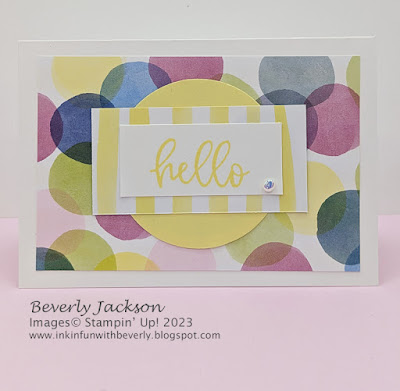
Some days call for a simple card and today's card couldn't be much simpler. When you just want to send a quick little note to someone, then a notecard is the perfect size for you.
Stampin' Up! makes it so convenient as you can purchase a pack of the notecards and envelopes, so all you have to do is fold the pre-scored card base in half, add your personal creative touch, write a note inside and it's ready to stuff in the envelope and pop in the mail. Easy peasy!
I chose the Bright & Beautiful 6 x 6 Designer Series Papers(DSP) not only for the fun prints and color combo, but also because of their size. I can get two cards like this out of one sheet of 6 x 6 and that's a win! The little striped accent piece behind the "hello" is the flip side of the end of the 3 x 6 piece I cut. Add a quick 2-3/8 Circle Punch of Lemon Lolly cardstock behind it and the card is almost finished. I always have to add a little bling 😉 and the small Flat Adhesive-backed Pearl is just the right accessory.
Gather Your Supplies:
- Biggest Wish stamp set
- Basic White Note Card for card base - 5 x 3-1/2 folded
- Basic White cardstock
- Lemon Lolly cardstock
- Bright & Beautiful Designer Series Paper
- 6 x 3 - scattered large circles with yellow/white stripe running lengthwise on reverse side
- cut to 4-1/2 x 3, remaining piece is 1-1/2 x 3
- Lemon Lolly Classic Stampin' Pad
- Flat adhesive-backed Pearls
- 2-3/8 Circle Punch
Product List
=============================================================
Here's How It's Made:
Adhere circle print DSP to Notecard front.
Punch Lemon Lolly cardstock with 2-3/8 Circle Punch. Adhere to DSP panel, centering.
Ink "hello" with Lemon Lolly, stamp onto Basic White cardstock, centering. Adhere stamped piece to white/yellow striped DSP print, centering. Adhere assembled piece to Notecard front, centering on Lemon Lolly 2-3/8 circle.
Embellish with small Flat adhesive-backed Pearl on lower right corner of stamped layer.
=============================================================
Essential Tools:
These are the tools I recommend for a positive experience with all of your paper crafting projects. Having the right tools makes every project go more smoothly from start to finish.
Product List
=============================================================
=============================================================
I LOVE being a Stampin' Up! Demonstrator for a variety of reasons! If you love stamping and sending cards, getting together with friends and being creative, want a way to reach out to your community, earn some money doing something you love, or any combination of these things, and more, now is a great time to join!
I am a member of Dawn Olchefske's DOStampers STARS community, so when you join my team, you are also part of this fabulous community where we share inspiration, creativity, support and education, as well as a whole new group of crafting friends!
=============================================================
- Place an online order of $65 or more (before tax/shipping) and earn a FREE Gift (FREE Gift sent by August 15th)
- For orders of $150 or more in my store (before tax/shipping), do not apply the Host Code. Use the Stampin' Rewards you will earn. You will receive the Host code gift from me.
- One Host code gift per customer, per month.
=============================================================
Thank you so much for stopping by! I hope you're inspired to gather your supplies and get creative!
Have a beautiful day! 😊
Beverly J


No comments:
Post a Comment