Greetings!
This card came together when I was trying to figure out to make a wreath without buying one of the current holiday sets to get a wreath die. Then I remembered! The Painted Labels dies have the perfect die for the wreath! The die comes with a solid middle so the right sized circle from the Layering Circles dies cut the middle out leaving us with a beautiful wreath to work with.
The greeting in the Words of Cheer stamp set says "from my home" needed to say "from our home" so it required a little modification. Luckily the word "Yours" has "Our" in the middle of it making it an easy fix.
The Bloom Where You're Planted Designer Series Papers were just the ticket to have this wreath look like it's hanging on a wall.
Isn't it fun! Those papers are perfect, aren't they? The pine boughs and stars come from the
Christmas Cheer dies and are just the right size for the wreath! It's so much fun when elements from sets come together to create the look you're hoping for.
Gather Your Supplies:
- Words of Cheer Bundle (Save 10% when purchasing stamp set & dies with bundle item#)
- Painted Labels Dies
- Garden Green cardstock
- card base 5-1/2" x 8-1/2" scored and folded at 4-1/4"
- Bloom Where You're Planted Designer Series Papers (DSP)
- 5-1/4" x 3" wood plank print
- 5-1/4" x 3/8" brick print
- 5-1/4" x 1" scattered branches print
- 2-3/4" x 1-1/2" wood grain print
- Copper Foil Sheets
- Evening Evergreen cardstock
- Garden Green & Evening Evergreen cardstock scraps for pine boughs
- Basic White cardstock
- Evening Evergreen Classic Stampin' Pad
- Elegant Faceted Gems
- Champagne Rhinestones
- 5-1/2" Old Olive/Pretty Peacock 3/8" Reversible Ribbon
- Layering Circles dies
=============================================================
Product List =============================================================
Here's How It's Made:
Adhere wood plank print onto card base front at top, adhere branches print on bottom with top edge butting against bottom of wood plank print. Adhere small brick strip over bottom edge of wood plank print.
Snip one edge of ribbon at an angle. Position Old Olive/Pretty Peacock Ribbon with angled edge near bottom of Evening Evergreen cardstock strip. Attach ribbon on front with a small piece of adhesive at near bottom angled edge and at top (there will be excess ribbon at top). Fold excess ribbon over back of cardstock and secure with adhesive. Adhere assembled piece to card front 1/2" from right edge of DSP.
Die cut wreath from Copper Foil Sheet. Align Layering Circles die that fits in middle and die cut. Die cut little stars from the Christmas Cheer dies out of copper circle that was cut out of middle of wreath.
Adhere wreath to upper left of card using Multipurpose liquid glue. Die cut small pine bough pieces from Garden Green and Evening Evergreen scraps. Adhere to wreath with Multipurpose liquid glue. Adhere die cut stars with mini glue dots and attach Elegant Faceted Gems and Champagne Rhinestones to decorate wreath.
Multipurpose liquid glue dries tacky so use sparingly along edges. When using on thin pieces it's best to dab small dots of glue along the back of piece, place onto card, and press.
The Take Your Pick Tool makes attaching small pieces easy and precise. Use the Putty Tip for easy grabbing and placement of small embellishments.
The greeting in this set is modified from "From MY home..." to "From OUR home...". To make this modification, ink and stamp the greeting in Evening Evergreen on Basic White cardstock. Ink the bottom two lines of the greeting and stamp on a separate piece of Basic White cardstock. Cut out the word MY from in between "from" and "home" leaving all the white space in between MY and the other words. On the line below, cut the word OUR out of the middle of YOURS. Run a bead of liquid glue over the middle line of your full greeting and carefully adhere the "From Our Home" into the middle of the greeting. Attach it to the die cut label and adhere to card front with Stampin' Dimensionals.
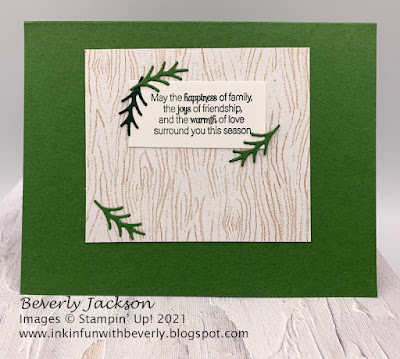
Here's what the inside looks like:
Cut woodgrain print 3-1/2" x 3" and adhere to inside of card.
Select sentiment and stamp onto Basic White cardstock piece, then cut down for small border. I chose this sentiment from the Merry Snowflakes stamp set.
Die cut a few more pine boughs and adhere.
==============================================================
Option 2: This wreath uses the Brushed Metallic adhesive-backed dots as the decoration:
==============================================================
Essential Tools:
Product List ==============================================================
November HOST Code: NK3NNPKU
- Place an online order of $65 or more (before tax/shipping) and earn a FREE Gift (FREE Gift sent by December 15th)
- For orders of $150 or more in my store (before tax/shipping), do not apply the Host Code. Use the Stampin' Rewards you will earn. You will receive the Host code gift from me.
- One Host code gift per customer, per month.
=============================================================
Thank you so much for stopping by! I hope you're inspired to gather your supplies and get creative!
Have a beautiful day! 😊
Beverly J


 Designer Series Paper")


 Reversible Ribbon")


No comments:
Post a Comment