Monday, December 11, 2023

Lining Your Envelopes With Designer Series Papers

Greetings!

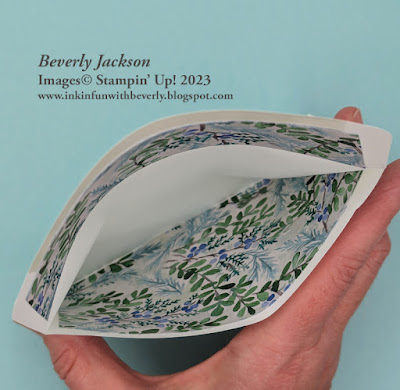
A few days ago I was talking with my friend Diane and telling her how I like to line my envelopes with Designer Series Paper prints.  I explained that it's a great way to use up the papers and also helps to protect the card inside, especially when it's embellished.  

She suggested that I blog about it and show the dimensions, etc., so here it is!

If you are a paper crafter and lover of printed papers as many I know are, then it is really tough to throw any of those papers out.  It can also become challenging trying to figure out ways to use them up so you can justify ordering new ones.  I think we can all agree that Stampin' Up! provides us with beautiful printed papers, and the assortments have a great variety within each pack.  Unless you are making boatloads of cards, there is usually leftover sheets and we want to use them up.  This is where lining the envelopes is a very helpful and useful way to use them.

For me it began a few years ago with my Christmas cards.  I always purchase multiple Designer Series Papers for my cards.  They're beautiful, I love variety, and typically they are included in the suites so if I buy the suite or the bundle, I want to have the coordinating prints.  I would finish my cards and still have leftover papers, so I started lining the envelopes with the leftover papers.  I discovered it leveled up my Christmas cards as well as giving them extra protection when mailing them.  We all know the machines the cards get run through can do damage to the envelopes if our cards have rhinestones or raised embellishments.  Instead of simply adding a sheet of paper over the front of the card this lining does the same thing, but stays secure in the envelope.  

I cut the papers to easily slip inside the envelope on the back side and also under the glue line of the flap.


Now when then card goes in, the front of the card will face the lined inside, the flap will be sealed shut, and the card has a nice added layer of protection.  

And now you have a great way to use up your extra sheets of printed papers.  

The paper used for this lining are a print from the Winter Meadow Designer Series Papers. This lined envelope is for the card I made for the November 30, 2023 blog post.  


=============================================================
Here's How It's Made:

Cut a 5-3/8 x 3-1/2 and a 5-3/8 x 1-1/2 piece of paper.  Cut off a small angled piece from each short end of the 1-1/2 piece - as shown in the photo below:


Turn pieces over and apply a strip of adhesive along one long edge of the large piece (envelope liner piece) and along the shorter long edge of the small piece (envelope flap liner piece) as shown here:


Adhere envelope flap piece so adhesive edge is just below glue line of envelope flap, and bottom edge of liner is just above the fold.


Insert envelope liner with adhesive strip along upper edge, slide into envelope keeping adhesive away from inside of envelope until liner is all the way in, then press adhesive edge against envelope inside back.


Your card is now ready to be inserted into the envelope:


And it's ready to mail: 


I hope you enjoyed this idea!  I appreciate my friend Diane requesting a post detailing how I do the liners for my envelopes.


=============================================================

Essential Tools:

These are the tools I recommend  for a positive experience with all of your paper crafting projects.  Having the right tools makes every project go more smoothly from start to finish.

Product List

=============================================================


=============================================================

The time has come to say goodbye to select items from the September-December 2023 mini catalog.  Check out the LAST CHANCE PRODUCTS to make sure you get those items you have on your wish list but haven't ordered yet.  Once they're gone, they're gone.  Many are discounted so your procrastination was worth the wait ;)


=============================================================
I LOVE being a Stampin' Up! Demonstrator for a variety of reasons!  If you love stamping and sending cards, getting together with friends and being creative, want a way to reach out to your community, earn some money doing something you love, or any combination of these things, and more, now is a great time to join! 


I am a member of Dawn Olchefske's DOStampers STARS community, so when you join my team, you are also part of this fabulous community where we share inspiration, creativity, support and education, as well as a whole new group of crafting friends!
=============================================================


December Host Code:  FH2HBUV6

  • Place an online order of $65 or more (before tax/shipping) and earn a FREE Gift                        (FREE Gift sent by January 15th)
  • For orders of $150 or more in my store (before tax/shipping), do not apply the Host Code.  Use the Stampin' Rewards you will earn.  You will receive the Host code gift from me.
  • One Host code gift per customer, per month.

=============================================================

Thank you so much for stopping by!  I hope you're inspired to gather your supplies and get creative!  

Have a beautiful day!  ðŸ˜Š  
Beverly J


No comments:

Post a Comment