Greetings!
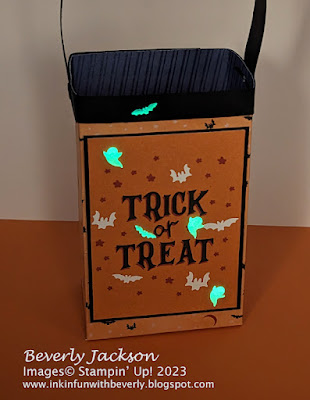
Halloween is a couple weeks away yet so there is still time to whip up a couple adorable trick or treat bags. This little bag goes together quite quickly and doesn't even include any stamping! The Them Bones Designer Series Papers (DSP) are filled with awesome prints including a few that have writing, so you can simply cut them out and use them as the focal point on your bag. There are many adorable images that will work. My trick or treating days may be long gone, but this bag is the perfect size to hold just a few treats, so you're not overloaded with sweets in the house. The finished bag size is 3"w x 2"d x 5"h not including the handle.
You may notice the addition of the little ghosts and bats that seem to somewhat blend in scattered on the front. A little subtle touch until you see them in the dark after they've been exposed to the light. They are Glow in the Dark! Check it out!
How fun is that!
Gather Your Supplies:
- Them Bones Designer Series Paper
- 10-1/2 x 7 scattered bats on Pumpkin Pie background
- Trick or Treat panel
- Basic Black cardstock
- 3-7/8 x 2-7/8
- 10 x 3/4 for handle
- 11 x 1/2 for band on bag
- Glow-In-The-Dark Bats & Ghosts
- 2 Black Square Brads
- Take Your Pick Paper Piercer Tip
=============================================================
Product List
=============================================================
Here's How It's Made:
Here is the template for cutting and scoring your DSP print.
Apply Tear & Tape adhesive along score line of tab piece as shown below:
Fold tab towards inside, then fold bag at 5" score line so cut edge will be aligned with edge by tab, remove protective covering, press to adhere securely, as shown here:
Fold at other score lines to get bag shape. Fold bottoms in, sides first. Apply Multipurpose liquid glue to each layer as you fold them in. Multipurpose liquid glue works best, as it allows you to adjust as you go, allowing for a nice squared up bottom to your bag. Press layers together firmly from inside onto a solid surface.
Cut "Trick or Treat DSP print" down to a finished size of 2-3/4 x 3-3/4. Adhere to Basic Black cardstock, adhere to front of bag.
To soften Basic Black 1/2" band, press the edge of a bone folder along it, like you would do for curling ribbon. Apply adhesive in middle of strip, adhere to front of bag, then gently fold around to sides, creasing at corners, apply adhesive and secure sides, fold around to back, creasing at corners apply adhesive, overlap and secure ends.
Soften 3/4" handle cardstock the same way as the band. This will give it a slight curve as well. Position end of handle over outside of band extending 1/4" below band, center, poke a hole with the paper piercer tip, insert a Black Square Brad, open ends on inside, and flatten against bag side. Repeat with other side.
Embellish "Trick or Treat panel" with Glow-in-the-Dark Bats & Ghosts.
Enjoy your little bag of treats!
=============================================================
Essential Tools:
These are the tools I recommend for a positive experience with all of your paper crafting projects. Having the right tools makes every project go more smoothly from start to finish.
Product List
=============================================================
=============================================================
I LOVE being a Stampin' Up! Demonstrator for a variety of reasons! If you love stamping and sending cards, getting together with friends and being creative, want a way to reach out to your community, earn some money doing something you love, or any combination of these things, and more, now is a great time to join!
I am a member of Dawn Olchefske's DOStampers STARS community, so when you join my team, you are also part of this fabulous community where we share inspiration, creativity, support and education, as well as a whole new group of crafting friends!
=============================================================
October Host Code: PGGUU2TE
- Place an online order of $65 or more (before tax/shipping) and earn a FREE Gift (FREE Gift sent by November 15th)
- For orders of $150 or more in my store (before tax/shipping), do not apply the Host Code. Use the Stampin' Rewards you will earn. You will receive the Host code gift from me.
- One Host code gift per customer, per month.
=============================================================
Thank you so much for stopping by! I hope you're inspired to gather your supplies and get creative!
Have a beautiful day! 😊
Beverly J


No comments:
Post a Comment