Thursday, September 21, 2023

Something Fancy Sentimental Park Garden Walk Wedding Wishes Belly-band Card

Greetings!

I recently purchased the Something Fancy stamp set.  This set has great messages that fill in some of the gaps my other stamp sets don't have.  One of those gaps is a nice message for a wedding card and this set has a wonderful one.  I also wanted to use the Garden Walk Designer Series Papers (DSP) for their beautiful prints in colors and designs that pair well.  I chose a stripe to represent the masculine and a small floral to represent the feminine.  I know - so stereotypical!  


I knew I wanted the one print to overlap the other for a fun fold and that I also needed a great focal point bringing the two prints together.  Belly-band to the rescue!  Once I decided on the belly-band, my next decision was what to use to highlight the "CONGRATULATIONS".  The Sentimental Park dies have so many little flower dies and great labels.  This made it an easy choice for decorating the label as the flowers closely resemble the floral DSP print.  I love how it all came together!

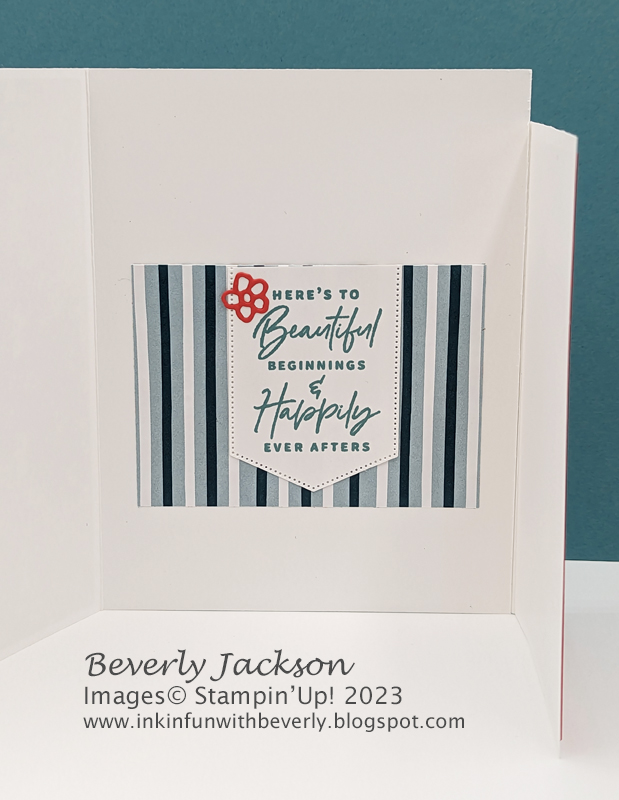
The inside of the card features the wonderful message, which is on a little pocket to hold a gift card or cash.  It's all secured nicely with the belly-band until it's slid off to reveal the beautiful message and gift inside.

Gather Your Supplies:

  • Something Fancy stamp set
  • Sentimental Park dies
  • Basic White cardstock 
    • card base 5-1/2 x 8 scored at 3-3/4 along 8" edge.  Card front will be 3-3/4, card back will be 4-1/4
    • additional card base piece - 5 x 4, scored at 3-1/4 along 4" edge
    • 3-1/4 x 2 (2)
  • Poppy Parade cardstock
    • 4-3/4 x 3
    • scraps for flower die cuts
  • Pretty Peacock cardstock
    • 11 x 3/4 for belly-band
    • scraps for flower die cuts
  • Garden Walk Designer Series Paper 
    • 5-1/4 x 3-1/2 Pretty Peacock/Pool Party/White stripe print
    • 3-1/2 x 2-1/2 Pretty Peacock/Pool Party/White stripe print (for inside)
    • 4-1/2 x 2-3/4 Poppy Parade/Pool Party/Pretty Peacock/Wild Wheat small floral print
  • Lost Lagoon Classic Stampin' Pad
  • Lost Lagoon 1/4" Bordered ribbon -  14"
  • Iridescent Pearls Basic Jewels
  • Flat Adhesive-backed Pearls
=============================================================
Product List

=============================================================
Here's How It's Made:

Adhere striped DSP panel to Basic White card base front.  Adhere floral DSP print to Poppy Parade cardstock, then adhere to Basic White additional card base piece.  Apply two strips of adhesive to the 3/4 x 5 strip of the additional card base piece, adhere to back right of card base with bottom edges even.  The additional card base piece will overlap the card front from the right side, as shown here:


Wrap Pretty Peacock belly-band strip around closed card, crease at folds, and adhere overlapping edges in back.  Make sure it's loose enough to slide off the card.  Wrap Lost Lagoon ribbon around belly-band, tie a knot at left front side.


Die cut Basic White piece with smooth edged Sentimental Park label die.   Ink "CONGRATULATIONS" with Lost Lagoon, stamp in center of label.  Die cut Pretty Peacock and Poppy Parade cardstock flowers in various sizes of both solid petal flowers and outline flowers.  Adhere to Basic White label on opposite edges of "CONGRATULATIONS".  Embellish small flower centers with Iridescent Pearls, and larger flower centers with Flat adhesive-backed Pearls.  


Ink "here's to beautiful..." with Lost Lagoon, stamp onto remaining Basic White cardstock piece.  Position smooth edged label die cut over sentiment, vertically, die cut.  Cut off top edge and adhere to remaining striped DSP piece, aligning top of sentiment along long edge of print, centering.  Embellish with a flower die cut.  Adhere assembled piece to inside of card with Tear & Tape adhesive along both sides and bottom edge to create pocket for holding gift card or cash.

=============================================================

Essential Tools:

These are the tools I recommend  for a positive experience with all of your paper crafting projects.  Having the right tools makes every project go more smoothly from start to finish.

Product List

=============================================================


=============================================================
I LOVE being a Stampin' Up! Demonstrator for a variety of reasons!  If you love stamping and sending cards, getting together with friends and being creative, want a way to reach out to your community, earn some money doing something you love, or any combination of these things, and more, now is a great time to join! 

I am a member of Dawn Olchefske's DOStampers STARS community, so when you join my team, you are also part of this fabulous community where we share inspiration, creativity, support and education, as well as a whole new group of crafting friends!
=============================================================


September Host Code:   37WBWWNK

  • Place an online order of $65 or more (before tax/shipping) and earn a FREE Gift                        (FREE Gift sent by October 15th)
  • For orders of $150 or more in my store (before tax/shipping), do not apply the Host Code.  Use the Stampin' Rewards you will earn.  You will receive the Host code gift from me.
  • One Host code gift per customer, per month.

=============================================================

Thank you so much for stopping by!  I hope you're inspired to gather your supplies and get creative!  

Have a beautiful day!  😊  

Beverly J 

Monday, September 18, 2023

Pick of the Patch & Them Bones Graveyard Halloween Card

Greetings!

You know, I didn't think I needed the Pick of the Patch bundle until I saw a couple cards my friend Dawn made, one of them featuring the crow, and it was then that I fell off the fence onto the side of "I gotta have this set!".  I don't even really like crows - they're noisy - and are somewhat mean to other birds and small creatures so I can't even tell you why that was the deciding factor.  It just was!  You now have a glimpse into the inner workings of my mind - scary, huh! 😄

This bundle really is a great bundle.  Lots of cute shapes for pumpkins, gourds, and squash, as well as all the accoutrements to go with them so you can deck out your card for your fall holidays.  The punch that's part of this bundle punches out two different sized and shaped pumpkins as well as the stem and leaf, so it makes it super easy to make cards quickly.  When you pair this bundle with the fun printed panels which are part of the Them Bones Designer Series Papers (DSP) you can make whimsical Halloween cards in a snap!


These papers are gorgeous with the lovely dusk type hues to the background, which really help to highlight the tombstones and give it the spooky vibe.  With a 12 x 12 sheet with 3 tombstone scenes one each opposing end, you can get six adorable cards out of each sheet of DSP.  

Notice the little bats and the ghost - in case you missed it in the catalog or while shopping online, they glow in the dark!  How cool is that!
 
Where's the crow,  you ask.  He's on the inside, so scroll down to find him. 😀

Gather Your Supplies:

  • Pick of the Patch Bundle (Save 10% when you purchase stamp set & punch with bundle item#)
  • Smoky Slate cardstock 
    • card base 4-1/4 x 11 scored & folded at 5-1/2    OR    5-1/2 x 8-1/2 scored & folded at 4-1/4
  • Orchid Oasis cardstock
    • 5-3/8 x 4-1/8 panel
  • Petal Pink cardstock
    • scrap for pumpkin
  • Old Olive cardstock
    • scrap for leaf
  • Mossy Meadow cardstock
    • scrap for stem
  • Them Bones Designer Series Paper 
    • 5-1/4 x 4 tombstone scene print
  • Pumpkin Pie Classic Stampin' Pad
  • Old Olive Classic Stampin' Pad
  • Pebbled Path Classic Stampin' Pad
  • Tuxedo Black Memento Ink Pad
  • Glow-in-the-Dark Bats & Ghosts
=============================================================
Product List

=============================================================
Here's How It's Made:
Adhere Orchid Oasis cardstock panel to Smoky Slate folded card base.  Adhere tombstone scene DSP print to Orchid Oasis cardstock panel.

Ink one of the pumpkin stamps that coordinates with the punch (either size works) with Pumpkin Pie and stamp onto Petal Pink cardstock, punch.  Ink jack-o-lantern face with Tuxedo Black and stamp onto pumpkin.  

Ink leaf stamp with Old Olive, stamp onto Old Olive cardstock, punch.  Ink stem with Pebbled Path, stamp onto Mossy Meadow cardstock, punch.


Adhere stem and leaf to pumpkin with mini glue dots.  Adhere assembled pumpkin to card front with Stampin' Dimensionals.

Embellish with Glow in the Dark Bats & Ghost.

Here's what the inside looks like:

As I mentioned in the introduction, the crow is so cute so I had to use him.  Here he is, wishing a Happy Halloween.


Ink branch with Pebbled Path, stamp at upper right edge of inside of card.  Ink crow with Tuxedo Black and stamp so he's standing on the branch.

Ink "happy Halloween" with Old Olive, stamp below branch.


=============================================================

Essential Tools:

These are the tools I recommend  for a positive experience with all of your paper crafting projects.  Having the right tools makes every project go more smoothly from start to finish.

Product List

=============================================================


=============================================================
I LOVE being a Stampin' Up! Demonstrator for a variety of reasons!  If you love stamping and sending cards, getting together with friends and being creative, want a way to reach out to your community, earn some money doing something you love, or any combination of these things, and more, now is a great time to join! 

I am a member of Dawn Olchefske's DOStampers STARS community, so when you join my team, you are also part of this fabulous community where we share inspiration, creativity, support and education, as well as a whole new group of crafting friends!
=============================================================


September Host Code:   37WBWWNK

  • Place an online order of $65 or more (before tax/shipping) and earn a FREE Gift                        (FREE Gift sent by October 15th)
  • For orders of $150 or more in my store (before tax/shipping), do not apply the Host Code.  Use the Stampin' Rewards you will earn.  You will receive the Host code gift from me.
  • One Host code gift per customer, per month.

=============================================================

Thank you so much for stopping by!  I hope you're inspired to gather your supplies and get creative!  

Have a beautiful day!  😊  

Beverly J